
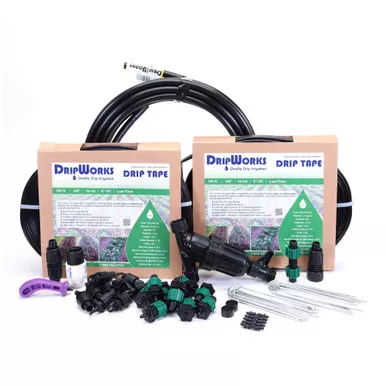
Professional Irrigation for Home Row Crops.
Watering long rows of vegetables like corn, beans, or strawberries requires precision and efficiency. The Small Drip Tape Row Crop Kit brings commercial-grade agricultural technology to the home gardener. This kit includes 200 feet of 15-mil Drip Tape, a durable, thin-walled tubing used by farmers worldwide to water long, straight rows with low pressure and high uniformity.
Designed for rows up to 20 feet long (expandable to much longer runs), this system operates at a low 10 PSI to prevent tape rupture while ensuring every plant gets equal water. The included 15-mil tape is significantly more durable than standard disposable tape, often lasting 3-5 years with proper care. It is an excellent choice for both beginning gardeners and seasoned pros looking to automate their harvest.
We have pre-calculated the components so you don’t have to. The kit is fully expandable, capable of supporting up to 1,200 feet of tape with the included mainline. For the ultimate convenience, we highly recommend adding a Brass Y-Splitter to your faucet so you can keep your garden hose attached for other uses while the system runs.
This system connects easily to any standard outdoor hose faucet.
Step 1: The Header (Faucet Assembly)
If using a Timer, attach it to the faucet first. Next, screw on the Filter, then the 10 PSI Pressure Regulator, and finally the Easy Loc Female Hose Start.
Crucial: You MUST use the included 10 PSI regulator. Standard 25 or 30 PSI regulators can burst Drip Tape.
Step 2: Lay the Mainline
Run the 1/2″ Mainline Tubing along the top of your rows (perpendicular to the crop rows). Close the end of the mainline with the Figure 8 End.
Step 3: Connect the Tape
Use the included Punch Tool to punch a hole in the mainline for each row. Insert the barbed end of the Drip Tape Row Start (LSB). Attach the Drip Tape to the other side by turning the locking nut backward, sliding the tape over the barb, and twisting the nut forward to lock it (Tape Loc technology).
Step 4: Cap the Ends
Run the tape down your row. Cut it to length and use the Drip Tape End Plug to seal the line. Secure the tape with Hold Down Stakes.
For detailed assembly instructions click here, or for more detailed plans see the downloads section below.