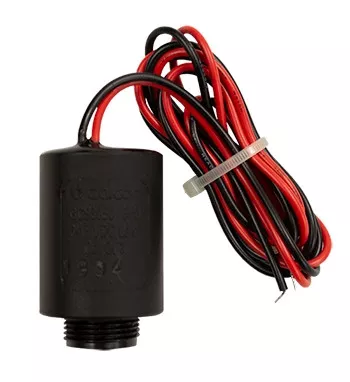
Quickly Restore Your Battery-Operated Valve
The Galcon DC Solenoid (2-Wire) is the exact OEM replacement part designed to bring your unresponsive battery-operated irrigation zones back to life. If your Galcon DC Valve is failing to open or close when prompted by the timer, the internal electronic solenoid is usually the culprit.
Instead of cutting out PVC pipe and replacing the entire valve manifold, this 2-way magnetic latching solenoid allows you to perform a fast, tool-free repair. Simply unscrew the old unit and thread this replacement directly onto the existing valve body. Built with a rugged, nylon-reinforced housing and durable EPDM seals, it provides a reliable, waterproof pulse connection when wired to any compatible DC battery controller.
- No-Plumbing Repair: Saves massive amounts of labor by allowing you to fix a broken valve without digging up or cutting the underground mainline.
- Magnetic Latching Efficiency: Operates via a quick pulse of energy from a battery controller, preserving battery life for seasons of use.
- Durable Construction: Features a heavy-duty nylon-reinforced plastic housing and internal EPDM seals to survive damp, dirty valve box conditions.
- Direct OEM Fit: Ensures a perfect, leak-free seat on existing Galcon DC inline valve bodies.
Detailed specifications for system repair.
| Specification | Details |
|---|---|
| Power Type | 6-18 Volt DC Latching Pulse |
| Valve Compatibility | Designed specifically for Galcon DC Valves |
| Wiring | 2-Wire configuration (Red / Black leads) |
| Operating Pressure | 10 to 145 PSI |
| Internal Seals | EPDM and Buna-N O-Rings |
Follow these steps to successfully replace your faulty solenoid.
Step 1: Shut Off Water Supply
Turn off the main water line feeding the valve manifold to ensure there is no active pressure before you remove the old component.
Step 2: Remove the Old Solenoid
Disconnect the old wire splices. Firmly grasp the old solenoid on top of the valve and twist it counter-clockwise to unscrew it completely from the valve body.
Step 3: Install the New Solenoid
Check that the rubber O-ring is seated properly at the base. Thread the new Galcon DC solenoid clockwise onto the valve port and hand-tighten until snug (do not use wrenches).
Step 4: Splice the Wires
Using waterproof silicone-filled wire nuts, splice the red wire to the positive terminal/station wire on your DC controller, and the black wire to the negative/common wire.