Push-to-Install Precision. Zero Glue. Total Versatility.
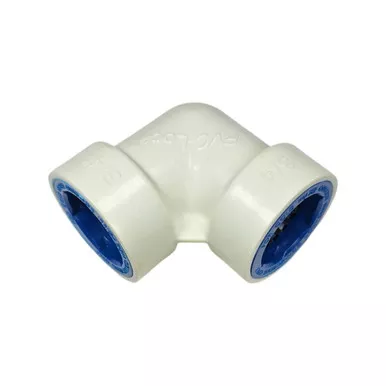
The PVC-Lock 90° Elbow is a revolutionary advancement in mainline and lateral line installation. Designed to eliminate the need for toxic glues and primers, this push-fit fitting allows you to navigate 90-degree corners in your PVC system instantly. To ensure the clean, square cuts required for a leak-proof seal, we recommend using a PVC pipe cutter during assembly.
Part of the professional Hydro-Rain family of irrigation fittings, these elbows feature a patented “Retaining Ring” with stainless steel teeth that grip the pipe tight, while a high-pressure O-ring creates a permanent seal. Whether you are repairing a burst line or installing a new manifold, PVC-Lock reduces installation time by over 50%.
- Instant Pressurization: Unlike traditional solvent welding, there is no “cure time.” You can turn the water on the second the fitting is pushed into place.
- Wet-Install Ready: PVC-Lock fittings can be installed underwater or in mud, making them the ultimate tool for emergency irrigation repairs where the line cannot be fully dried.
- 360° Rotation: Once pushed onto the pipe, the elbow can be rotated freely for easy alignment before the system is pressurized.
- Environmentally Friendly: Eliminates the inhalation of VOCs and prevents chemical primers from leaching into the soil.
Built for high-pressure performance in residential and commercial irrigation.
| Specification | Details |
|---|---|
| Connection Type | PVC-Lock Push-Fit (Slip x Slip) |
| Body Material | ABS / UV Stabilized PVC |
| Internal Components | Stainless Steel Gripping Teeth & EPDM O-Ring |
| Max Working Pressure | 150 PSI |
| Verified MPNs | 1/2″: 37671 (PVCL-90-05) 3/4″: 37672 (PVCL-90-07) 1″: 37673 (PVCL-90-10) |
Step 1: Square the Cut
Using a PVC cutter, ensure the pipe end is cut square. A jagged or angled cut may damage the internal O-ring.
Step 2: Clean and Deburr
Remove any burrs or sharp edges from the outside of the pipe. The pipe surface must be smooth to slide past the O-ring.
Step 3: Mark the Depth
Mark the insertion depth on the pipe (approx. 1.5″ to 2″ depending on size) to ensure the pipe is fully seated against the internal stop.
Step 4: Push to Lock
Push the pipe into the fitting with a slight twisting motion. You will feel it pass the O-ring and hit the stop. Give it a sharp tug to verify the stainless steel teeth have engaged.