Highly Accurate Diagnostics for Your Drip System
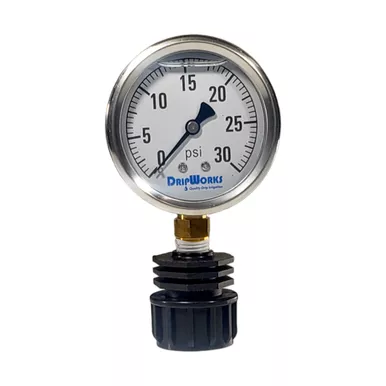
The Liquid-Filled Pressure Gauge is the ultimate diagnostic tool for maintaining a healthy, efficient irrigation system. Because it is filled with liquid (typically glycerin), it absorbs system vibrations and dampens water hammer spikes. This prevents the needle from bouncing and provides a significantly more accurate and steady reading compared to standard air-filled gauges.
Equipped with a convenient hose swivel adapter inlet, this gauge can be easily threaded directly onto a standard outdoor faucet, garden hose, or any male hose-threaded fitting. To test the pressure at specific zones along your mainline, simply temporarily splice a 1/2″ Male Hose Tee into your tubing. Once you have your PSI reading, remove the gauge and cap the tee to resume normal watering.
- Superior Accuracy: The liquid-filled casing stabilizes the needle, providing precise PSI readings by eliminating bounce and vibration.
- Easy Connection: Features a 3/4″ female hose thread (FHT) swivel inlet that attaches to standard hose bibbs and hose threads without the need for adapters.
- System Diagnostics: Ideal for verifying incoming city water pressure or troubleshooting pressure drops anywhere along your drip mainline.
- Multiple Ranges: Available in different PSI ranges (like 30 PSI or 100 PSI) to perfectly match the demands of your specific irrigation setup.
Detailed specifications for system testing and planning.
| Specification | Details |
|---|---|
| Gauge Type | Liquid-Filled (Anti-Vibration) |
| Connection Size | 3/4″ FHT (Female Hose Thread) Swivel |
| Available Variants | 30 PSI or 100 PSI |
| Application | Temporary Diagnostic Testing |
Follow these simple steps to measure the exact pressure within your drip mainline.
Step 1: Install a Male Hose Tee
Cut your 1/2″ poly tubing at the location you want to test. Insert a 1/2″ Easy Loc Male Hose Tee (ELMT) or Compression Male Hose Tee (CMT) to bridge the cut.
Step 2: Attach the Gauge
Take the Liquid-Filled Pressure Gauge and screw the female hose thread swivel inlet securely onto the male hose threads of the newly installed tee.
Step 3: Read the Pressure
Turn on your water source. The liquid-filled dial will stabilize, allowing you to take a highly accurate PSI reading for that specific zone.
Step 4: Remove and Cap
Turn off the water and allow the line to depressurize. Unscrew and remove the gauge, then twist a standard Hose Cap (HCAP) onto the tee to permanently close the test port.